TLS and mTLS deep dive
You can grab the code of this article here on github
mTLS or MTLS is an acronym for Mutual Transport Layer Security. TLS(Transport Layer Security) is the encryption protocol which powers the HTTPS. mTLS is a spin on TLS where both client and server are going to exchange certificates before communication begins.
Let's understand this in plain English.
1 TLS
TLS (sometimes referred as SSL) is a very widely used protocol. It is used to secure client server communication by encrypting the communicated information. It involves Public key infrastructure (PKI), TLS Certificates, TLS Handshakes.
1.1 Public key infrastructure (PKI)
- You have two keys, called Public and Private keys.
- Both of these keys come with a set expiration period.
- Data encrypted by the Public key can only be decrypted by its Private key.
- Data encrypted by the Private key can only be decrypted by its Public key.
data --------> [public key] -----> encrypted data
										  |
										 \|/
						data <--------[private key]


data --------> [private key] -----> encrypted data
										  |
										 \|/
						data <--------[public key]
The server freely provides Public key to anyone. But guards the Private key with it's life.
1.2 TLS Certificates
A TLS certificate is a data file that containing the public key, information of the encryption algorithm, information of the certificate issuer, and the certificate's expiration date.
TLS certificates are issued by a trusted third party called certificate authority. Sometimes written as CA or CA authority.
Let's encrypt is one such trusted certificate issuer authority among many others.
TLS certificate = Public key +
				  encryption algorithm infromation +
				  identity information +
				  expiry date
1.3 TLS Handshakes
The TLS handshake is the process to achieve 2 things:
- Checking the TLS certificate validity
- Making sure that the server actually owns the private key.
First part is done by validating the certificate against a list of root CA certificates which are already available on the client side.
On Linux systems, typically a file located at /etc/ssl/certs/ca-certificates.crt contains the verification certificates of all the trusted certificate authorities. If this check fails, client shall panic about an un-trusted certificate.
Second part is done by asking the server to decrypt something encrypted by the Public key file from the provided certificate.
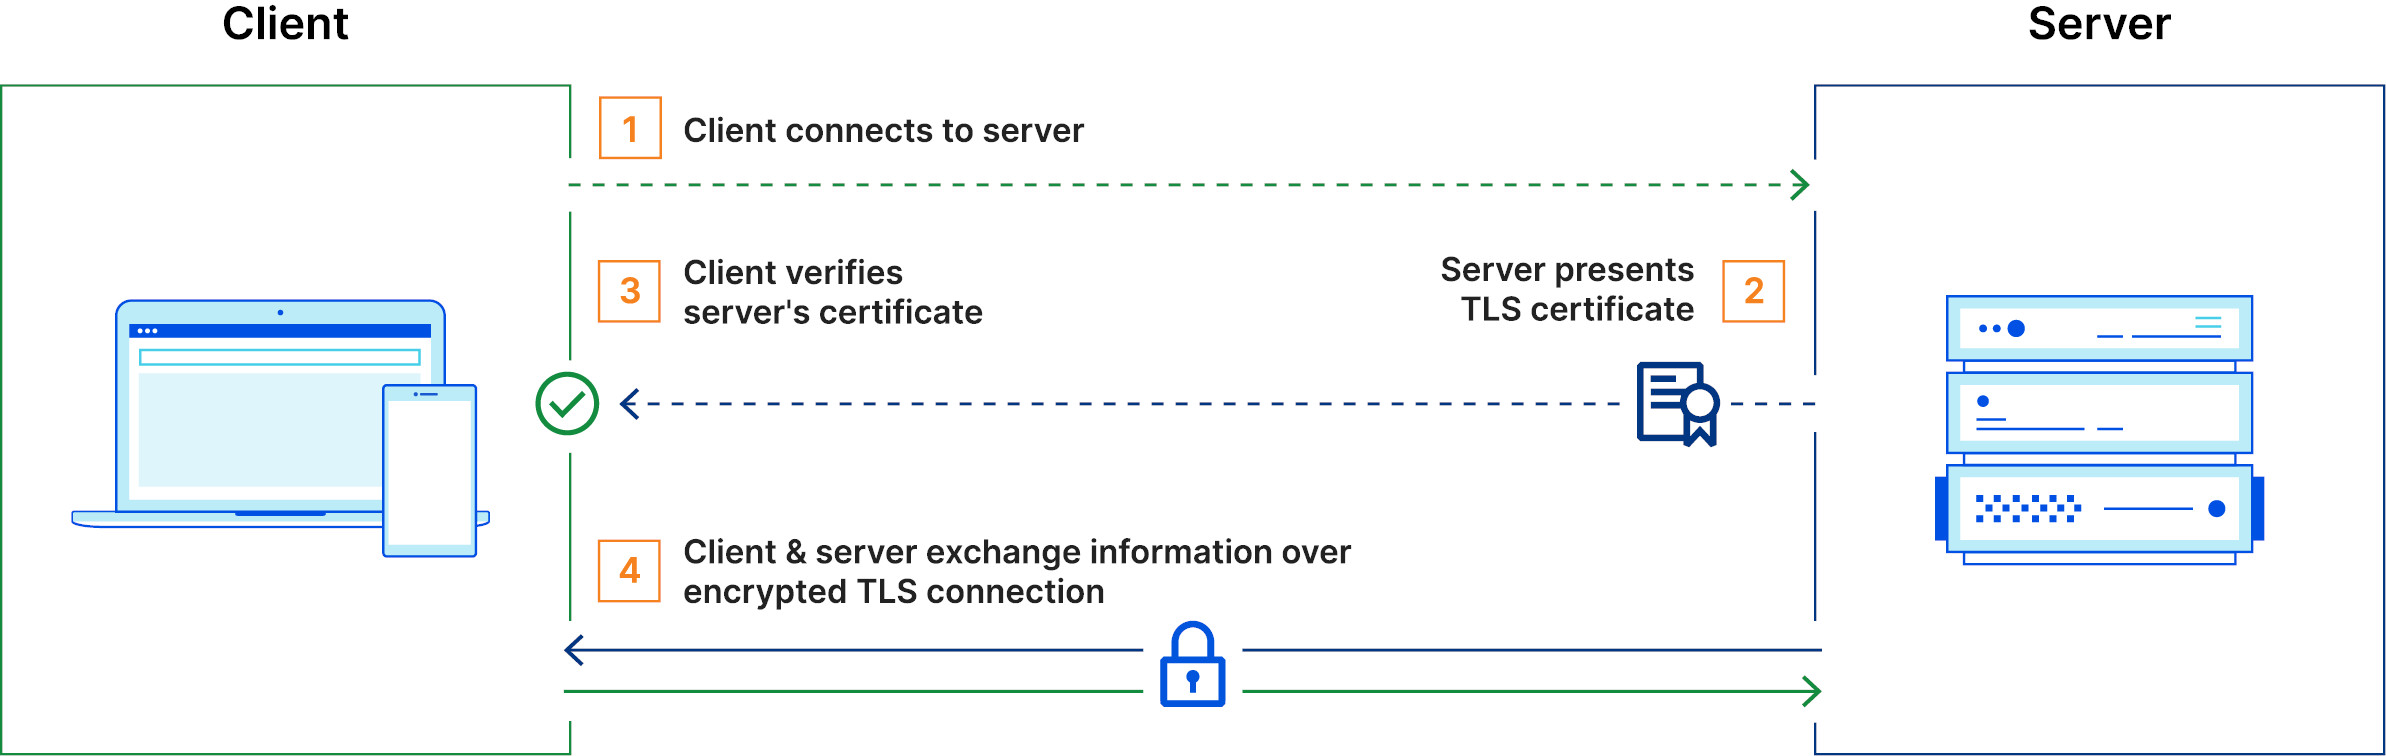
2 How TLS works
With above concepts, working of TLS is fairly straightforward.
The server has a TLS certificate and the key pair as well. Process goes something like following:
- Client connects to server
- Server sends its TLS certificate
- Client verifies the server's certificate (TLS handshake)
- Client and server exchange information over encrypted TLS connection
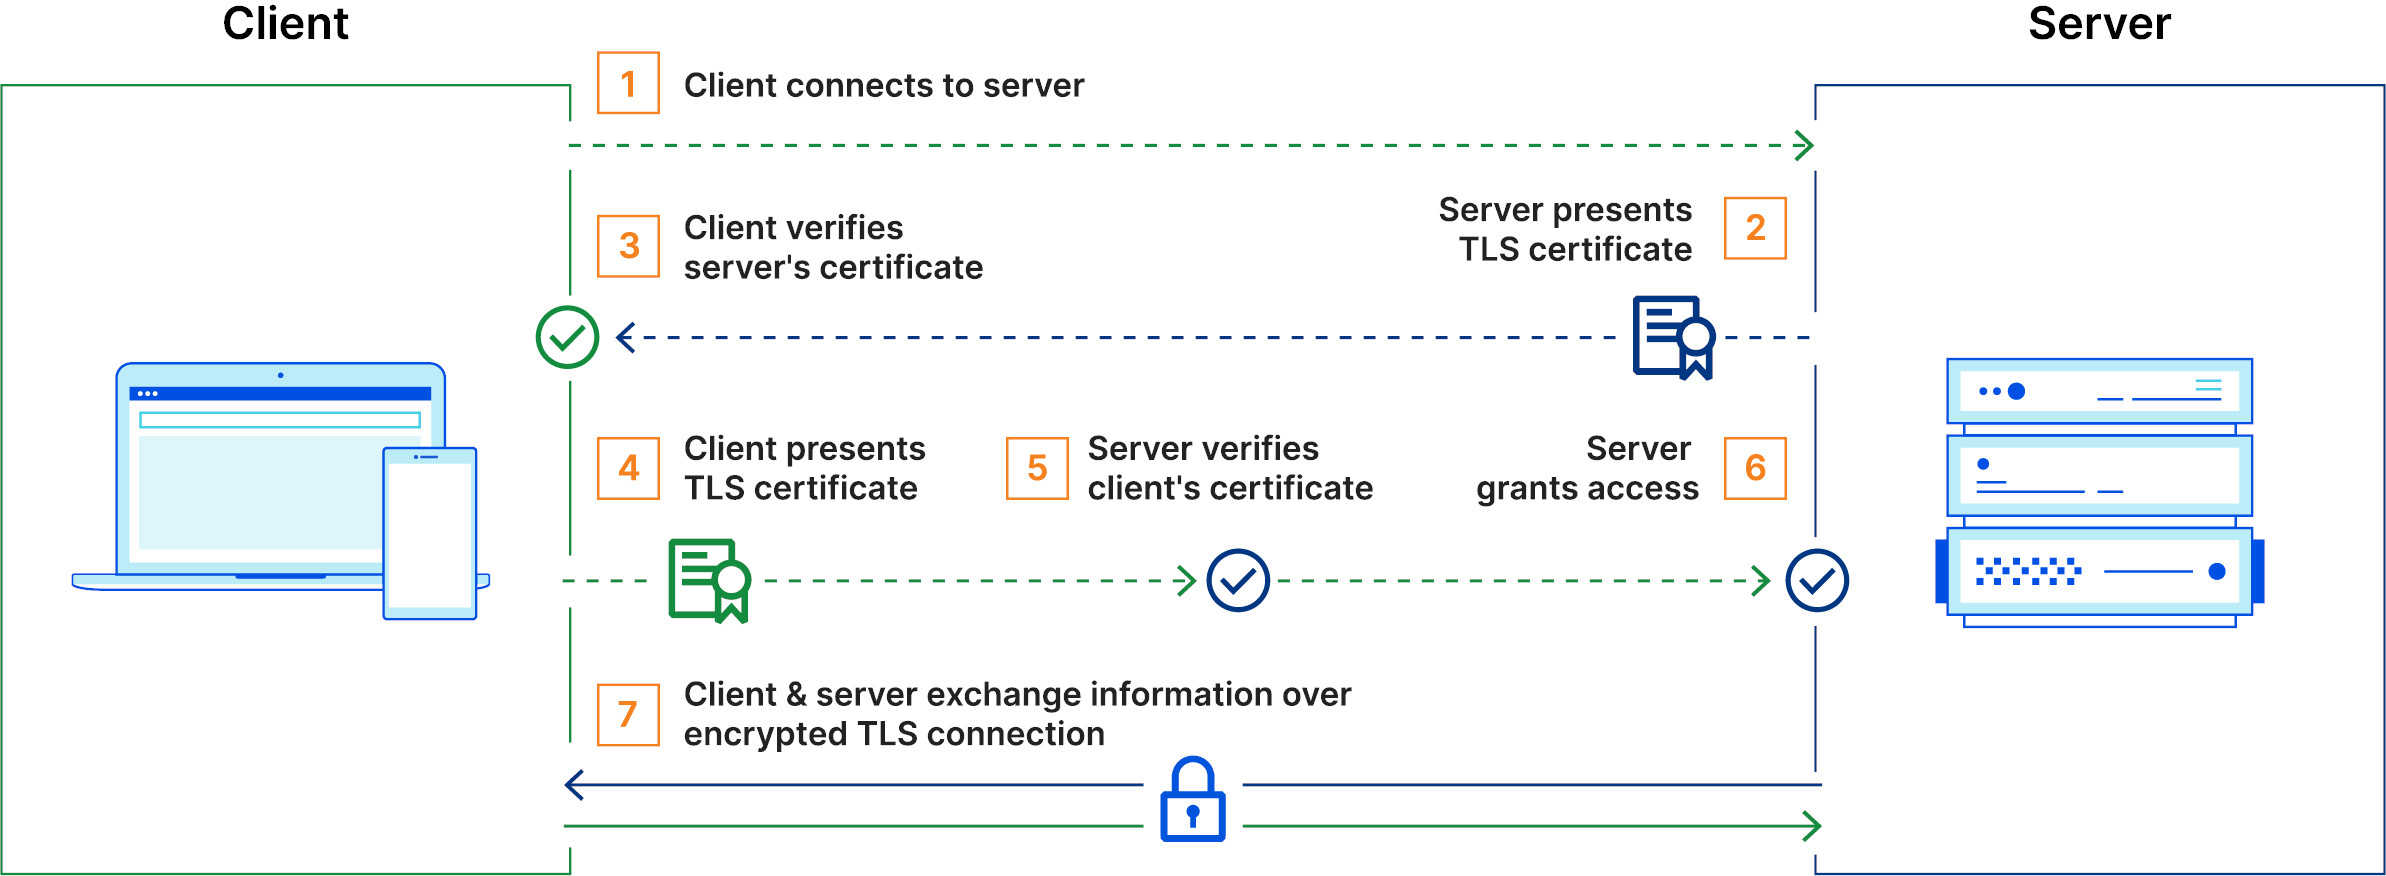
3 How mTLS works
Mutual Transport Level Security is built on top of TLS. Process is very similar, but with an added twist of client bringing it's own certificate and key pair to the picture. mTLS process looks like following:
- Client connects to server
- Server sends its TLS certificate
- Client verifies the server's certificate (TLS handshake)
- Client sends its TLS certificate
- Server verifies the client's certificate (TLS handshake, again)
- Server grants access
- Client and server exchange information over encrypted TLS connection
4 Code time
To get going we shall need
- A root certificate to sign both client and server certificates
- A server certificate
- A client certificate
- NGINX in docker to run the mTLS configured server
- Humble
curl
We shall go ahead with a simple bash file to get our certificates
Start by creating a file named mtls_test.sh and enter the following contents.
#!/bin/bash

mkdir certs
cd certs

# save pass in a file for root certificate
printf secret > ca_passphrase.txt

# generate 4096 bit RSA private key in des3 fromat. This will require passphrase
openssl genrsa -des3 -passout file:ca_passphrase.txt -out ca.key 4096

# convert ca.key from des3 to RSA format. This too shall require passphrase
openssl rsa -passin file:ca_passphrase.txt -in ca.key -out ca.key

# now create a certificate (aka public key of ca.key + signature) for this private key
openssl req -new -passin file:ca_passphrase.txt -x509 -days 3650 -key ca.key -subj "/CN=*.test.server" -out ca.crt


# save pass in a file for server certificate
printf secret > passphrase.txt

# generate a 2048 bit private key for server in des3 format
openssl genrsa -des3 -passout file:passphrase.txt -out server.key 2048

# use this private key to create a certificate signing request (CSR) for server
openssl req -new -passin file:passphrase.txt -key server.key -subj "/CN=*.test.server" -out server.csr

# now create a certificate (aka public key of server.key + signature) for this private key
# we are making this certificate valid for 365 days. Also sign it with the certificate authority
openssl x509 -req -days 365 -in server.csr -CA ca.crt -CAkey ca.key -set_serial 01 -out server.crt


# save pass in a file for server certificate
printf secret > client_passphrase.txt

# generate a 2048 bit private key for server in des3 format
openssl genrsa -des3 -passout file:client_passphrase.txt -out client.key 2048

# convert client.key from des3 to RSA format.
openssl rsa -passin file:client_passphrase.txt -in client.key -out client.key

# use this private key to create a certificate signing request (CSR) for server
openssl req -new -key client.key -subj "/CN=*.test.client" -out client.csr

# now create a certificate (aka public key of server.key + signature) for this private key
# we are making this certificate valid for 365 days. Also sign it with the certificate authority
openssl x509 -req -days 365 -in client.csr -CA ca.crt -CAkey ca.key -set_serial 01 -out client.crt
Save this file in an empty directory.
Next let's write a simple NGINX configuration equipped with mTLS. Put the following contents in a file called nginx.conf
server {
error_log /var/log/nginx/error.log debug;
    listen 443 ssl;
    server_name  test.your.hostname;
    ssl_password_file /etc/nginx/certs/password;
    ssl_certificate /etc/nginx/certs/tls.crt;
    ssl_certificate_key /etc/nginx/certs/tls.key;

    ssl_client_certificate /etc/nginx/mtls/ca.crt;
    ssl_verify_client on;
    ssl_verify_depth  3;

    ssl_protocols             TLSv1 TLSv1.1 TLSv1.2;

    location / {
    	return 200 "This is an mTLS connection!  \(^o^)/  ";
    }

}
Lastly run this command to start the NGINX docker container
docker run --rm --name mtls-nginx \
		-p 443:443 \
		-v $(pwd)/certs/ca.crt:/etc/nginx/mtls/ca.crt \
		-v $(pwd)/certs/server.key:/etc/nginx/certs/tls.key \
		-v $(pwd)/certs/server.crt:/etc/nginx/certs/tls.crt \
		-v $(pwd)/nginx.conf:/etc/nginx/conf.d/nginx.conf \
		-v $(pwd)/certs/passphrase.txt:/etc/nginx/certs/password \
		nginx
Terminal should print info about NGINX worker process:
2022/07/29 09:27:29 [notice] 1#1: using the "epoll" event method
2022/07/29 09:27:29 [notice] 1#1: nginx/1.23.1
2022/07/29 09:27:29 [notice] 1#1: built by gcc 10.2.1 20210110 (Debian 10.2.1-6)
2022/07/29 09:27:29 [notice] 1#1: OS: Linux 5.15.55-2-lts
2022/07/29 09:27:29 [notice] 1#1: getrlimit(RLIMIT_NOFILE): 1048576:1048576
2022/07/29 09:27:29 [notice] 1#1: start worker processes
......
Now in a separate terminal we can use curl to verify the mTLS in action.
First we shall try to connect curl without client certificate:
$ curl https://localhost/ --insecure
<html>
<head><title>400 No required SSL certificate was sent</title></head>
<body>
<center><h1>400 Bad Request</h1></center>
<center>No required SSL certificate was sent</center>
<hr><center>nginx/1.23.1</center>
</body>
</html>
Now we shall try to connect curl with client side certificate:
$ curl  --key certs/client.key --cert certs/client.crt https://127.0.0.1 --insecure
This is an mTLS connection!  \(^o^)/
We can peek under the hood by specifying -v switch with curl
$ curl -v  --key certs/client.key --cert certs/client.crt https://127.0.0.1 --insecure
*   Trying 127.0.0.1:443...
* Connected to 127.0.0.1 (127.0.0.1) port 443 (#0)
* ALPN: offers h2
* ALPN: offers http/1.1
* TLSv1.3 (OUT), TLS handshake, Client hello (1):
* TLSv1.3 (IN), TLS handshake, Server hello (2):
* TLSv1.2 (IN), TLS handshake, Certificate (11):
* TLSv1.2 (IN), TLS handshake, Server key exchange (12):
* TLSv1.2 (IN), TLS handshake, Request CERT (13):
* TLSv1.2 (IN), TLS handshake, Server finished (14):
* TLSv1.2 (OUT), TLS handshake, Certificate (11):
* TLSv1.2 (OUT), TLS handshake, Client key exchange (16):
* TLSv1.2 (OUT), TLS handshake, CERT verify (15):
* TLSv1.2 (OUT), TLS change cipher, Change cipher spec (1):
* TLSv1.2 (OUT), TLS handshake, Finished (20):
* TLSv1.2 (IN), TLS handshake, Finished (20):
* SSL connection using TLSv1.2 / ECDHE-RSA-AES256-GCM-SHA384
* ALPN: server accepted http/1.1
* Server certificate:
*  subject: CN=*.test.server
*  start date: Jul 29 09:30:20 2022 GMT
*  expire date: Jul 29 09:30:20 2023 GMT
*  issuer: CN=*.test.server
*  SSL certificate verify result: self signed certificate (18), continuing anyway.
> GET / HTTP/1.1
> Host: 127.0.0.1
> User-Agent: curl/7.84.0
> Accept: */*
>
* Mark bundle as not supporting multiuse
< HTTP/1.1 200 OK
< Server: nginx/1.23.1
< Date: Fri, 29 Jul 2022 09:34:23 GMT
< Content-Type: application/octet-stream
< Content-Length: 57
< Connection: keep-alive
<
* Connection #0 to host 127.0.0.1 left intact
This is an mTLS connection!  \(^o^)/
We can see both the handshakes in action!
Congratulations now you know TLS and MTLS.